留言
如果您对我们的产品感兴趣并想了解更多详情,请在此留言,我们会尽快回复您。

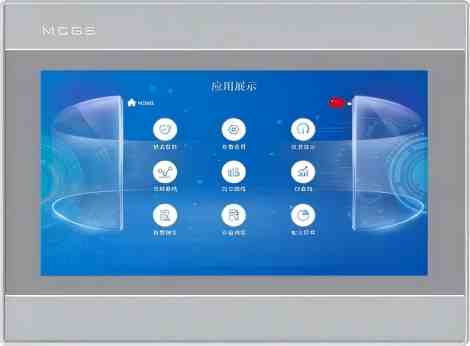
昆仑万维科技精心打造的G系列TPC是一款高端智能触控屏,旨在将先进技术与直观的用户交互完美融合。其采用优质材料,外观时尚现代,配备响应灵敏的高分辨率显示屏,呈现鲜艳色彩和清晰画面,带来沉浸式视觉体验。搭载尖端触控技术,提供精准的多点触控功能,使用户能够轻松导航、缩放并与各种应用程序进行交互。坚固耐用的结构确保了其卓越的耐用性,使其适用于工业和商业环境。G系列TPC旨在满足各种用户应用需求,从制造业的数据可视化和过程控制,到零售空间的互动信息亭、数字标牌和POS系统,均可胜任。凭借可定制的软件界面和对多种操作系统的兼容性,它提供了一种能够适应不同行业独特需求的灵活解决方案,通过性能与功能的完美结合,提升生产力并增强用户参与度。
产品规格
分类 | 物品 | TPC7071Gt |
产品特性
| 液晶屏 | 7英寸TFT |
背光类型 | 引领 | |
显示颜色 | 262K | |
分辨率(点分辨率) | 1024×600 | |
显示屏亮度 | 350cd/㎡ | |
触摸屏类型 | 四线电阻器 | |
输入电压 | 24±20% VDC | |
电源隔离 | 内置 | |
额定功率 | 6W | |
处理器 | Cortex-A53 四核 1GHz | |
内存 | 512MB | |
系统存储 | 8GB | |
总存储空间 | 8GB | |
硬件时钟 | 内置 | |
配置软件 | McgsPro 3.3.6.6354 SP1.3 版本 1 和 2 | |
外部接口
| 串行接口 | 方式 1:COM1(232) COM2(485) COM3(485) COM4(232) 方式 2:COM1(232) COM4(232) COM9(422) |
USB接口 | 1个主机,1个从机 | |
以太网端口 | 1 × 10/100M 自适应 | |
环境条件
| 工作温度 | 0℃~50℃ |
工作湿度 | 5%~90%(非冷凝) | |
储存温度 | -10℃~60℃ | |
储存湿度 | 5%~90%(非冷凝) | |
产品规格
| 外壳材料 | 工程塑料 |
外壳颜色 | 深灰色 | |
外部尺寸 | 226毫米×163毫米 | |
货架开口 | 215毫米×152毫米 | |
显示尺寸 | 155毫米×88毫米 | |
认证与合规
| 产品认证 | 符合CE/FCC认证标准 |
保护级别 | IP65(前面板) | |
电磁兼容性 | 工业级3级 |
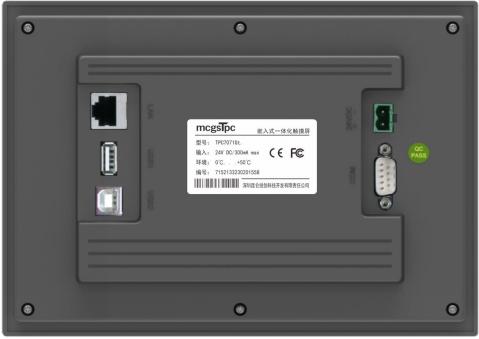
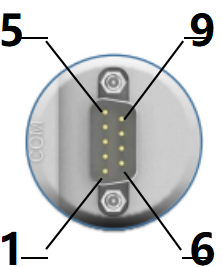
接口描述
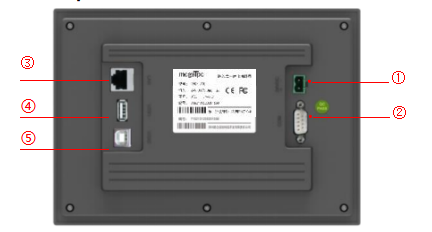
① | 电力来源 |
|
| - | 1 | 0V |
+ | 2 | 直流24伏 | ||||
② |
串口 |
|
COM1 | 2 | RS232 RXD | |
3 | RS232 TXD | |||||
5 | 接地 | |||||
COM2 | 7 | RS485+ | ||||
8 | RS485- | |||||
COM3 | 4 | RS485+ | ||||
9 | RS485- | |||||
COM4 | 1 | RS232 RXD | ||||
6 | RS232 TXD | |||||
5 | 接地 | |||||
COM9 | 7 | RXD+ | ||||
8 | RXD- | |||||
4 | TXD+ | |||||
9 | TXD- | |||||
注意:com9 不能与 com2 或 com3 同时使用。 | ||||||
③ | 网口 | 10M/100M 自适应以太网端口允许上传或下载项目、升级操作系统环境(屏幕的操作系统环境需要为 Pro 3.3.2 或更高版本)以及与其他设备通信。 | ||||
| ||||||
④ | USB 1 主端口 | USB 2.0 支持通过 USB 闪存驱动器更新触摸屏操作系统环境、项目和系统,以及数据导入和导出功能。 | ||||
⑤ | USB 2 端口 | USB B 型公头端口允许上传或下载项目 | ||||
产品安装
产品尺寸

外部尺寸
安装方法
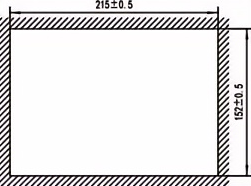
开口尺寸
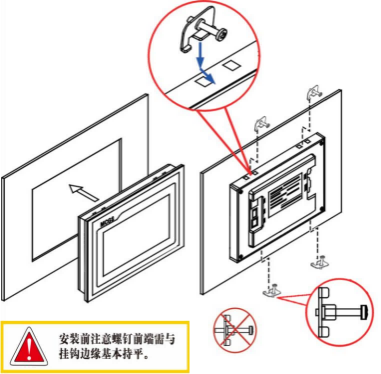
安装前,请确保螺丝尖端与挂钩边缘大致齐平。
挂钩安装
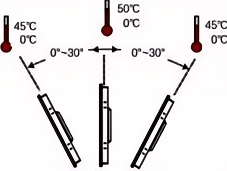
安装角度
产品介绍
1.5.1 更换电池
电池位置:TPC,位于产品内部电路板上。
电池规格:CR2032 3V 锂电池
安装过程中,请注意避免电池正负极短路。
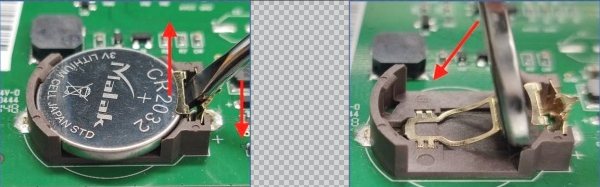
取出电池 安装电池
1.5.2 触摸校准
在系统设置界面中,进入TPC模式,长按空白区域。3. 触摸校准过程将在几秒钟内开始。
TPC 校准:使用触控笔或手指轻轻按压并按住十字光标的中心点。当光标移动到下一个点时,松开手指或手指。重复此操作,直到出现“已测量新的校准设置”的消息。单击“确认校准”按钮保存并退出校准程序。
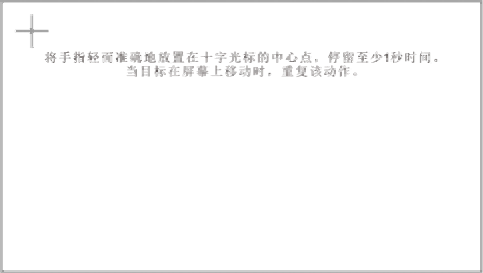
将手指轻轻准确地放在十字准星的中心,并按住至少一秒钟,直到目标在屏幕上移动。重复此操作。
1.5.3 三防膜
为TPC贴上保护膜可以有效防止生产过程中产生的灰尘、油污和其他污染物影响皮肤。TPC易腐蚀,因此,如有必要,可以使用保护膜来保护TPC。本文将以1271Gn为例进行说明;其他型号将在后续章节中讨论。TPC屏幕保护膜的贴法步骤类似。
所需工具:TPC 包括三防膜(可从丝网供应商处购买)、防尘布、防静电环保清洁剂和滚筒。
操作步骤:
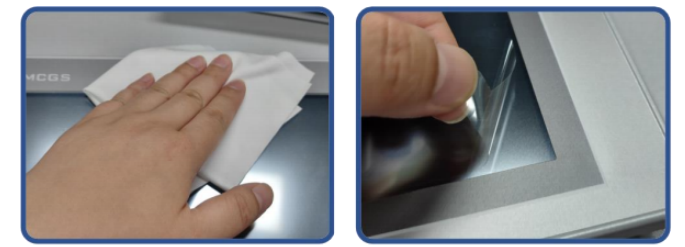
1)清洁屏幕。用除尘布擦拭屏幕正面面板上的灰尘,以防止贴膜时产生气泡。如果TPC表面污垢较多,请使用清洁剂清洁边缘缝隙中的污垢。
2)撕掉工厂安装的PET保护膜,清除残留物,以防止在粘贴过程中产生气泡。
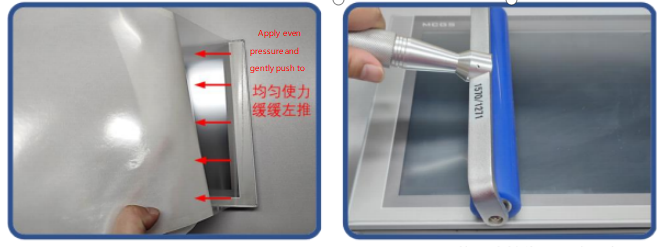
3) 撕下右侧背膜的一角。将背膜右侧与TPC的右侧对齐。用左手慢慢撕下背膜,然后用右手均匀用力,从右向左轻轻地将背膜按压到屏幕上。
4)贴膜后,用滚筒将背胶压紧,防止产生气泡。
注意事项:
1)贴三防膜前,必须先撕掉出厂时贴的保护膜。PET保护膜
2)三防膜属于消耗品。如果发现边缘剥落或鼓包,则需要更换新的防防膜。
3)更换保护膜时,从前面板的右下角将其撬起,注意不要刮伤密封膜。
2 项目下载
步骤 1:使用 24V 直流电源 TPC。上电启动后,屏幕上会出现“正在启动”的进度条。此时,点击 TPC①,您将进入启动配置界面。如果未进行任何操作,系统将自动进入项目运行界面。
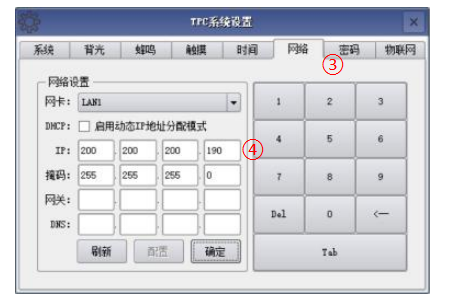
步骤 2:单击系统参数设置按钮②。进入 TPC 系统设置界面。
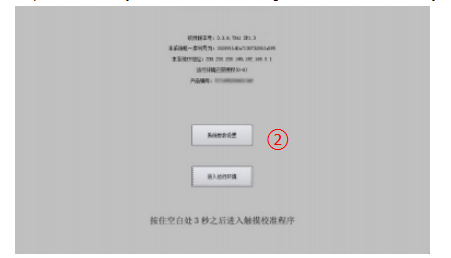
步骤 3:选择网络设置选项卡③,并配置... TPC IP 地址 4,TPC 默认 IP 地址为 200.200.200.190。
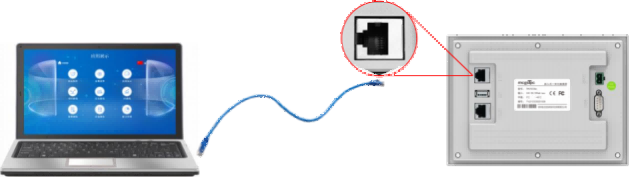
步骤 4:连接计算机和... TPC,以及计算机 IP。将连接的 TPC LAN 端口 IP 设置为同一网段。
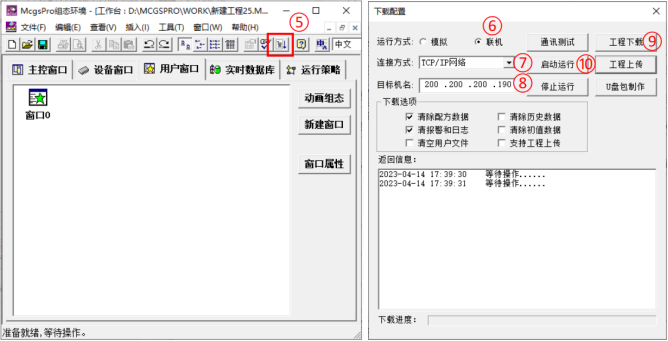
步骤 5:使用 MCGS Pro 打开 TPC 项目,点击下载项目⑤,打开下载配置属性页面,选择“在线”作为运行模式。选择连接方式“TCP/IP”“网络”⑦,输入目标机器名称 TPC 的 IP 地址⑧,点击“下载项目”(⑨)。下载成功后,点击“启动并运行”(⑩) 或… TPC 界面上的“进入运行时环境”按钮,即可运行屏幕端项目。

留言
扫码到微信 :

扫描至 WhatsApp :